|
||||||
 Here
are some of the things I've learned about using Window Maker that I'd
like to share with you. Hopefully, these simple "how-tos" can help
you in your day-to-day activities. Here
are some of the things I've learned about using Window Maker that I'd
like to share with you. Hopefully, these simple "how-tos" can help
you in your day-to-day activities.There are some terms that I use below that may be slightly different to what you're used to, when using other desktop environments. For example: Window Maker is a window manager (not a desktop manager), so the space on your screen that you work in is not described as a "desktop", but rather a "workspace". And when I refer to "dockapps", these are the mini-applications that exist on your workspace in the little boxes typically found on the right or bottom edges. I am using the version of Window Maker that is provided by the Linux distribution, ALT Linux. Of all of the different Linux distributions that provide Window Maker in their repositories, I find that ALT Linux has done the best implementation of this window manager. Therefore, if you're not using ALT Linux's implementation of Window Maker, your mileage may vary. Table of Contents: Fix Oversized Fonts - Alternate To Taskbar - Adding Directories to Main Menu - Restore Window Titlebar
Check out my blog for more of my postings about Linux and Window Maker: https://www.thegrove.in.nf/retroblog Fixing Oversized Fonts For GTK ApplicationsThe default font size chosen for applications that utilize the GTK tool set may be "oversized" for the screen size you're using. To fix this, you can use the gtk-theme-switch application to adjust the fonts to a more appropriate size. First, install the application with (or use the appropriate package manager command for your Linux distribution):
Then run/execute with:
Click the check box next to the Use Font field and then the Browse button to bring up the font selection window. Adjust accordingly and then click Okay and then Apply.  Compensating For Not Having a TaskbarSince Window Maker doesn't have a taskbar, you typically have to use ALT-TAB to switch between applications when those applications are maximized in your workspace. However, there is a way to use the Window List Menu (middle-mouse-click) to switch between applications; all you need is a tiny sliver of the workspace exposed to do so. Here's how I do it:
 What this has done is assigned a one pixel border on the left and right sides of your workspace screen, which prevents applications from covering it when maximized. Now, when you want to switch between applications and don't want to have to reach for ATL-TAB, bring your mouse pointer to either left or right edges of the screen and middle-click. The Window Select Menu will appear and you can then click on the application you wish to make active. Another quick way to get the menu to appear is to press F11. (Thanks, paulodelgado!) Adding Directory Contents to WM Main MenuThis is a handy feature that can make accessing the files on your computer faster and easier than having to start up your favorite file manager/viewer. Window Maker allows you the ability to add a view of any file folder on your computer right into the Main Menu. For example, here is a look at my Documents folder on my computer:
From here, I can open up any of the folders or documents that are listed in the sub-menus, saving me the trouble of having to open up my file manager or any associated applications first. There is a caveat to this ability, but more on that in a moment. First, let me show you how to get a folder added to your Main Menu.
 Now, here's the caveat for all of this
to work, what ever you put into the Command to Open Files option must
be able to launch/open the files that are displayed in the
sub-menus. In this example, I've commanded WM to use my file
manager, XFE, to open the files. But, in order for any files to be
opened (like a .doc, .xls, or .pdf, for example), XFE must be able to
know what to do with those files. So, if you're using a file
manager like I am, that file manager must have the appropriate
application "associated" with the document types.
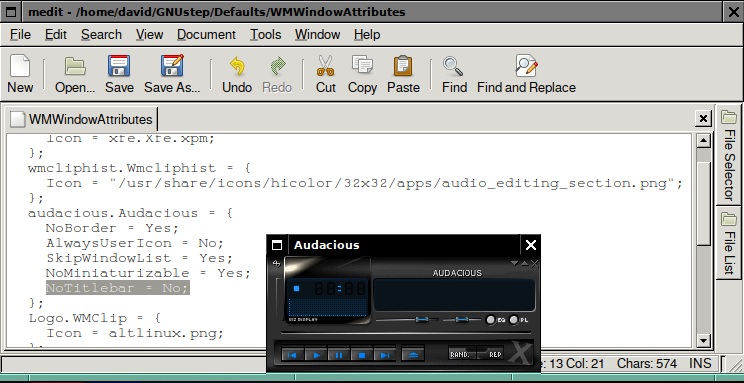
The other helpful thing you can do when viewing your documents this way, is that you can temporarily "detach" a folder view from the main menu and keep it on your workspace for quick reference. For example, if wanted to view the assorted PDFs that I found in my Commodore folder (as shown above) and not have to keep navigating to that sub-menu every time I want to view the next PDF, I can simply click on the top border of that sub-menu and drag it away from the main menu. 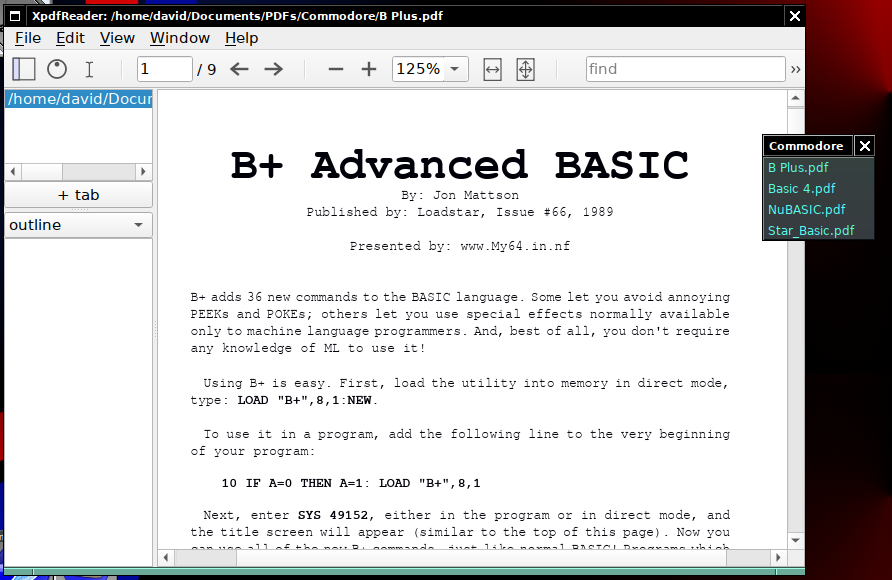 The detached sub-menu will remain on my workspace, until I click the X to close the window. This makes it very convenient to work with multiple files, as I don't have to keep navigating through the directory listing to see the list of files each time I wish to work with one of them. Restore a Window's Title BarThere are sometimes that you either do not need or want to see a title bar on some applications, like on the Audacious music player. It has it's own minimize/maximize/close button integrated into it's interface, so the standard toolbar that Window Maker provides is redundant and takes away from the aesthetics of the application. So, you can hide the Window Maker tool bar via the Window Attributes settings, by right-mouse clicking on the tool bar and choosing Attributes... But, what happens if you want to reactivate the tool bar? You no longer have said tool bar to right-mouse-click on. You can bring back the tool bar by turning off the tool bar "blocker" by editing the config file directly. To do this, first you have to open a Terminal window, then follow these steps: Go to the directory that contains the window preference file with:
Note that your distribution of Linux may put Window Maker files under a different folder. If you don't have a GNUstep folder, then perhaps look for WindowMaker. Open up the file WMWindowAttributes with your text editor of choice (I use medit, but you can use what you're most comfortable with):
In the text document, find the line that starts with the name of the application you wish to restore the tool bar for, in my example "audacious", and change the line NoTitlebar = Yes; to NoTitlebar= No; Lastly, save the file. The next time you launch your application, the title bar will be restored.
Easily Change Your Workspace's WallpaperHere is an easy way to change the wallpaper for your Window Maker workspace. First ensure that you have the proper settings configured by right-mouse-clicking in "WMClip" (that paper clip icon in the top left corner of the screen) and then selecting Settings.. from the pop-up menu. In the settings dialog box, enter the following command in the "Command for dragged and dropped files" field:
Click on OK to save your changes. Now, you can drag and drop an image of your choice over to the Clip icon and it will change your workspace's wallpaper to match. In this example, -u updates Window Maker and -t will "tile" the image. But you can use other configurations, like -f (scale to fill) or -e (center). If you wish to see all of the options available, open up a terminal and type:
This will display the command's help screen and explain some of the options. Moving Windows As a GroupHere's an easy way that you can move several separate windows on your workspace as a group. Simply hold down the SHIFT key and click on the title bars of each of the windows you wish to "group". Window Maker will draw a white box around each of the windows as you click on them. When you're done selecting the windows, release the SHIFT key and then click and drag any of the windows within the group. They will all move together, as you drag your mouse pointer across the workspace. To release the group, just click your mouse anywhere on the workspace outside of the grouped windows. Maximize Windows to Left or Right Half of Screen
|
||||||
©Copyright 2024, TheGrove.in.nf - Contact Info: admin (at) thegrove.in.nf |